Wednesday, August 31, 2011

New Facebook Privacy Tweaks

Facebook has finally rolled out its new privacy center, which offers some long-awaited features (preapproved photo tags!) and reintroduces some older, lesser-known security options.
Some of the most important facebook privacy center features which you should know are summarized below.


1. Approve tags before they're published.
Facebook finally lets you approve tagged photos and posts of you before they land on your profile. How many times has a friend tagged you in an embarrassing photo?


To Configure Tagging Privacy:
Go to Account -> Privacy Settings and you'll see an option "How tags work". Hit "Edit Settings" next to it and you'll be prompted to edit your Tagging Settings. Now, every time someone tags you in a status, photo, or place, the post will appear in the Pending approval section on your profile.


2. Decide who gets to see your posts.
Facebook reintroduced selective posting in this privacy update (in order to compete with google plus). Once you write your status, click on the small triangle next to the Post button to make the post visible to: friends, public (anyone on the Internet), or custom (exclude individuals or lists).


To change the visibility after you've posted, head back to the post on your wall, hover over it, and click the drop-down menu in the upper-right to change the visibility.


3. Change privacy for any profile item.
It's now much easier to change the privacy for every element of your profile. For example, you can share your hometown with everyone, but your birthday to just your friends. Or, make it so that only close friends can see who you're in a relationship with.


Go to your profile and select Edit profile at the upper-right corner of the page. Then head to one of the categories (on the left) and change the privacy of its elements using the drop-down menu next to each field.


4. Select the default privacy setting for posts.
Head to your privacy settings, and scroll down to "Control your Default Privacy." Here, you can select the default audience for all your posts--Public, Friends, or Custom.
Tip: If you frequently post content you'd rather keep private from a certain group of people, create a list of all those people and exclude them by default using the Custom option in this privacy setting.


5. Preview your public profile.
Once you make all the privacy tweaks, see how your profile appears to certain friends or anyone on the Web.

Go to your profile and select "View profile as..." in the upper-right corner. Enter a friends name or select the public link in the instructions above the field to see what it looks like to everyone.


GrooveDown: Most Powerful Grooveshark Song Downloader

Grooveshark is the best web service which allows you to listen music online. One can stream the music online but the site doesn’t give any option to download songs. There are some third party applications available to download songs from Grooveshark, but downloading is not hassle free as one have to copy the song URL to the tool.

GrooveDown is the latest and best tool that lets you download songs without any hassle. One nice thing about this tool is you don’t even need to go to Grooveshark site to search the song. This tool comes with inbuilt search tool that searches songs from Grooveshark and displays it on its interface.


To download the software, go to GrooveDown. The download comes in a .rar file from which you have to extract the tool. The main window of GrooveDown is a simple box from where you can search for any song. Once you've found the right one, just right click on the song and add it to download list. Then from the download list you can start the download whenever you wish to. GrooveDown is probably the best software to download songs from Grooveshark.

Monday, August 22, 2011

How to Backup your Linux Computer


Ever wondered what will you do in case of a disk or system failure. No? Even Linux can't protect you from disk or system failure! But in order to get around this problem, it provides an option to make a compressed backup of all your data. Cloud storage is a good option to back up all your files but for many of us, it's not enough. Here's how to back up your data using Simple Backup Suite that's preinstalled in your Linux distribution (Note: I am using Ubuntu, so the details may slightly differ if you are using a different distribution):

1. From the search bar, just type "backup" to bring up preinstalled options. I'll be using Simple Backup Suite.
2. From the first tab "General", configure Linux how often you want to perform a complete back up and what format, if any, to use for compression.
3. To add files and directories for backup select the "Include" tab. The default is pretty good for most users, but you may have some important files that deserve to be backed up, so be thorough! You only have to do this once.
4. Select the Exclude tab if you want to keep some files or subfolders from being archived. There's no special reason to do this unless you're trying to save space.
5. Make sure to select the Destination tab to pick your storage location. As with any other backup, you'll want it to be as secure as possible. A network location is probably best, though your needs may vary.
6. Schedule tab lets you set a schedule to do incremental backups of files that have changed since the last backup. This happens in the background and shouldn't interrupt your day-to-day work.
7. Click the disk icon at the top to save your settings, then click the drive icon to back up your files. The first backup process will take a while.

Once you're done with it, the only reason you'd need to revisit the tool is to change the frequency, location, or contents of your backups.

Wednesday, August 17, 2011

Hit “Send” too soon? Learn How to Retract Gmail Messages


While using Gmail have you ever hit the ‘Send’ button too soon only to realize that you made a HUGE mistake? Say… send out an email to 500 people, only to realize you didn’t ‘bcc’ their address. Meaning everyone had access to the list of emails. Or you made some mistake which will prove to be a source of great embarrassment for you when the receiver reads your email.

Let me save you from the trouble of making such mistakes. Retracting is not a default feature in Gmail and has to be activated from your Mail Settings. ‘Undo Send’ feature helps you to retract your sent email if used within 30 seconds after the email was sent.

Ever heard of Gmail Labs? It’s a testing ground for Gmail features. If explored properly, Gmail Labs has lots of features which are very useful and one such feature is 'Undo Send'. Gmail Labs has both pros and cons.
Pros: lots of cool features to try
Cons: some of the Gmail Labs features can change, break, or disappear with time.

But Undo Send feature has been around for quite some time. Keep reading to find out how to enable the Undo Send feature in Gmail.


How to access Gmail Labs
  • Sign into your Gmail account.
  • In the top right-hand side corner, click on the little cog wheel button(options) and select ‘Mail Settings’.


    Enable “Undo Send” and Save Changes

    • click ‘Labs’ tabs in 'Mail Settings'
    • click ‘enable’ and ‘save changes’
    By default, you now have 5 seconds to retract an email after you hit the ‘send’ button. Not enough time? Keep on reading.


    Enable More Time to Retract an Email
    Within your settings dashboard, click on the ‘General’ tab. In the Undo Send Settings section click the dropdown button to select your desired send cancellation duration. Make sure that Enable Undo Send checkbox is ticked.


    Compose Email and Hit Send
    When you'll click on the Send button, you'll notice that in the yellow box above you'll have an option to “Undo”. Now you have a chance to retract your email. Hurry, because if you do not retract in the time allotted, the option will disappear. Forever!

    Tuesday, August 16, 2011

    Hacking WEP Wireless Network using Fern WIFI Cracker(GUI)

    WEP cracking can be done using Aircrack-ng in backtrack's terminal, the tutorial for which can be found here in case you want to learn all the commands involved. But this tutorial is for those who'd like to go for it the easy way and the easiest way is to use Fern Wifi Cracker which is a GUI(graphical user interface) for aircrack-ng.
    Fern Wifi cracker can be downloaded by searching for it on google or else it can be downloaded and installed using backtrack's terminal using this command:

    wget http://fern-wifi-cracker.googlecode.com/files/Fern-Wifi-Cracker_1.2_all.deb
    dpkg -i Fern-Wifi-Cracker_1.2_all.deb

    After the setup is done open Fern Wifi Cracker using the following command:
    /usr/share/applicationsFern_Wifi_Cracker.desktop

    Update Fern Wifi cracker if required.

    Follow all the steps carefully to successfully crack a WEP wireless network:

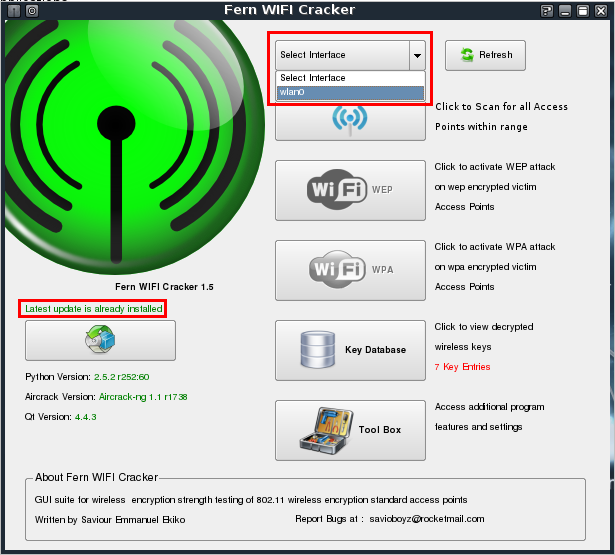
    1. Click on the drop done menu to select the interface you'd like to work on, in my case it is wlan0


    2. A popup will open within few seconds like this one:
    Click on Ok button. The next part is optional, but it’s my personally experience that cracking a network with connected client is much easier than without. So if you'd like to try it as well follow the step mentioned below:
    *Double click in any area of the main window
    *A window named Access Point Scan Preferences will open
    *Click the Enable XTerms checkbox
    *Click the Ok button


    3. If you did the part with enabling XTerm, two popups will appear. Since this tutorial deals with WEP cracking you can close the one named FERN (WPA SCAN). Now let’s have a look at the window called FERN (WEP SCAN). We need a accesspoint with a client connected to it. At the top half of the screen we see all the accesspoints in the area, and a lot of information about them. At the bottom of the window we see that a client is connected to a Accesspoint with the BSSID 00:13:f7:61:24:DA. If we compare this list in the top of the screen we will see that the name of this Accesspoint is SMC. So now we know that the accesspoint SMC have a client connected.


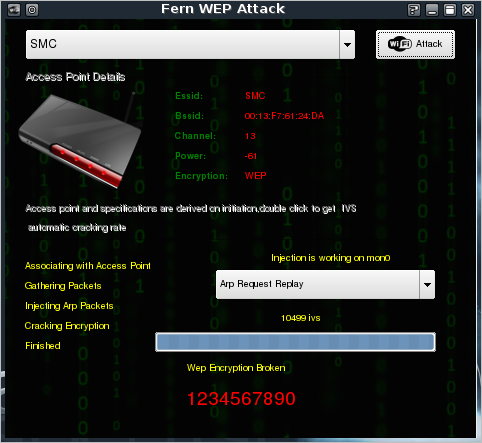
    4. Now close the window FERN (WEP Scan) and click on the Wifi WEP button. A window named Fern WEP Attack will open. Click on the drop down list to select the access point you'd like to work on, in my case it is SMC.


    5. Now click on the Attack button and wait until you get the following window displaying the key to the WEP wireless network you selected.

    Friday, August 12, 2011

    Google Plus Suspending Users with Pseudonyms and Nicknames

    Google Plus has finally decided to ban all the users using pseudonyms and nicknames in place of their real names. Though users will not be suspended immediately for violating Google Plus Common Names Policy, they will be given four day grace period to fix their profile names before they’re suspended.

    Google Plus Common Names Policy is designed to fight spam and prevent the creation of fake profiles. The suspension of users using pseudonyms or nicknames has resulted in criticism among various users. Though this criticism hasn't stopped Google Plus from deciding to eliminate the use of pseudonyms on its social network.

    Google Plus Product Manager Saurabh Sharma explained that the decision was made “to make connecting with people on the web more like connecting with people in the real world. During this period, you can continue to use Google+ as usual,” Sharma said. “We’re hoping that most affected users will be able to quickly fix their profile name while continuing to enjoy all that Google+ has to offer.”


    A quick tip - all users should update their profile as soon as possible to prevent their Google Plus profile from being suspended.

    Google Plus Games finally Released


    Some of the Google Plus users might have noticed a new button for games on top of their streams on Thursday. Google Plus is now offering a small range of games including Angry Birds, Sudoku, Crime City,  Zynga Poker etc. 

    The new gaming feature of Google Plus is announced by Vic Gundotra, senior vice president of engineering at Google. The button can take the users to the gaming page, allowing games to be available only when users want them.

    Adding games to the Google Plus is a smart move. This will probably result in dedicated Circles for gamers if Google Plus is able to provide some great games to its users, which will definitely draw a lot of crowd on the site.

    Users will find their high scores, other games that friends have played recently and invitations to play with other circles. Moreover in accordance with the privacy offered by Google Plus, only those circles will be updated with a user's scores and additional information in which the game is played. Of course users will have options to share these with other circles as well.

    Google Plus games can also be accessed from this link: https://plus.google.com/games 
    For those who haven't got the Games button on their Google Plus profile will be notified with the following message:

    Thursday, August 11, 2011

    Apple's iPhone 5 Sneak Peak


    The much awaited Apple's product iPhone 5 could look something like an enhanced version of iPod as per the leaked mockup designs by MacRumors. The new iPhone 5 will have tapered edges at its back along with a much sleeker look with close resemblance to iPod. It is also rumored that the back of iPhone 5 will have aluminium base instead of the iPhone 4 glassy base.


    The final dimensions of the new design are calculated to be: 4.33" x 2.36" and .27" thickness at the top and .21" at the bottom In comparison, the iPhone 4 dimensions are: 4.5" x 2.31" x .37". So the new design is actually shorter than the existing iPhone 4, but slightly wider and thinner. 


    The iPhone 5 is expected to be released in September or October of this year.

    Tuesday, August 9, 2011

    Top 10 Best Cloud Storage Services

    What is Cloud Storage?
    Cloud storage is a model of networked online storage where data is stored on multiple virtual servers, generally hosted by third parties, rather than being hosted on dedicated servers.


    Following are the 10 best and reliable services that offer free cloud storage along with the option of syncing your files from computer and/or mobile phones.


    1. Dropbox
    Dropbox provides integration on Windows, Linux, Mac, Mobile Phones (including a great little iPhone app and web interface), as well as convenient Firefox and Google Chrome extensions.
    Features include:
    1. 2GB of Dropbox for free, with subscriptions up to 100GB available.
    2. Your files are always available from the secure Dropbox website.
    3. Dropbox works with Windows, Mac, Linux, iPad, iPhone, Android and BlackBerry.
    4. Works even when offline. You always have your files, whether or not you have a connection.
    5. Dropbox transfers just the parts of a file that change (not the whole thing).
    6. Manually set bandwidth limits -- Dropbox won't hog your connection.


    2. Ubuntu One
    Ubuntu one works on Ubuntu, Windows as well as Mobile Phones. Supports multiple languages and offers 5GB of free storage capacity for the Basic version.


    3. SugarSync

    SugarSync offers 5 GB free cloud storage, and if your friend uses your referral link to sign up, you’ll earn a 500 MB bonus, up to 5 GB.
    SugarSync supports Windows and Mac computers, as well as iPads, iPhones, BlackBerry, Android, Windows Mobile and Symbian mobile phones.


    4. Windows Live SkyDrive
    Windows Live SkyDrive offers 25GB of free online storage. You can use SkyDrive storage to back up your files online for free, or to share large files with others. SkyDrive also gives you access to free Office Web Apps like Word, Excel, and PowerPoint so you can create, share and work online with others. With SkyDrive you can also create Word, Excel, and PowerPoint documents, even without having Microsoft Office installed.


    5. Google Docs
    Google Docs have added the ability to upload any type of file. Their upload filesize limit is 1GB and you get 1GB of storage for free. Along with Google Docs you also have your Gmail and Picasa storage (7GB and 1GB respectively), summing up to 9GB of free storage.
    Google does have plans for purchase as well, if you need more space, with a yearly pricing scheme (starting at just $0.25 per GB). And if its Google, its trustworthy for sure.


    6. Box
    Box offers some great features and compatibility options. Their free plan gives you 5GB of storage (25mb filesize limit) and there’s no shell integration (great web interface though), but they integrate with Google and Zoho and have a decent mobile app for the iPhone. Box supports Windows, Linux, Mac, Mobile phones, plus it also has various other features that can be viewed on its official website.


    7. ZumoDrive
    ZumoDrive offers 2 GB free storage, supports multiple languages, and works for Windows, Mac and Linux computers, as well as iPhone, Android, and Palm Pre mobile phones.


    8. TeamDrive
    TeamDrive offers 2 GB free space, and you can get 250 MB more by inviting every one user, the total free storage can be up to 8 GB. TeamDrive supports Windows, Mac and Linux.


    9. OpenDrive
    IDrive offers 5 GB storage, supports multiple languages, and works for Mac, Windows and iPhone as well as Android support.


    10. SpiderOak
    SpiderOak service offers 2 GB free storage. It supports Windows, Mac, Linux, Android and iPhone/iPad. If your friend uses your referral link to register on spideroak, you'll earn free storage space upto 50GB.

    Awesome Wallpapers

    Awesome High Resolution Wallpaper Collection